

More conditioner isn’t always better. Too much can leave a leather dog lead greasy, while an unsuitable cleaner may dry or mark it. If you’re wondering how to condition leather dog lead australia, start by checking the lead’s finish, current condition and care instructions.
It’s sensible to take care: water, heat and unsuitable products can affect leather, and a lead needs to feel comfortable in your hand and remain sound for walks with your furry mate. Baby wipes, eucalyptus oil and all-purpose cleaners may seem handy, but they can damage some leather finishes.
This guide covers how to clean and condition a lead carefully, choose a suitable product and store it between walks. You’ll also learn what to look for before conditioning and how to spot wear that needs attention before your next outing. A simple, responsive routine can help keep a leather lead supple and ready for everyday use.
Key Takeaways
- Learn how to condition leather dog lead australia by following the lead maker’s instructions and considering the leather’s finish and condition.
- Inspect and clean the lead before conditioning, using gentle methods and products suited to its finish.
- Apply a compatible conditioner sparingly, as different products can change the lead’s colour, texture or surface feel.
- Let the lead dry naturally away from direct heat, then inspect it before your next walk.
- Base your care routine on dirt, wet walks and the lead’s condition rather than a fixed schedule.
Why condition a leather dog lead, and when does it need care?
Conditioning is routine care intended to help leather stay supple and comfortable to handle. It is not a repair for torn or unsafe material, and it does not automatically waterproof a lead. As natural oils in leather can diminish over time, a suitable conditioner may help maintain the leather’s feel. The right product and method depend on the lead’s finish.
Start with the maker’s care instructions. Leather finishes vary, and a product that suits one lead may change another’s colour, texture or surface. Conditioning is also different from waterproofing. Don’t assume a conditioner will protect against water unless its label specifically says so. Neither treatment can restore a split lead, failed stitching or a damaged clip.
What does conditioning do for a leather dog lead?
A suitable conditioner may help maintain flexibility, making a lead more comfortable to hold on everyday walks. It is care, not a fix. Applying more product won’t strengthen split leather or stitching that’s coming undone. If you’re learning how to condition leather dog lead australia, use the lead’s own instructions as your starting point rather than assuming one product suits every lead.
How can you tell when your lead needs attention?
Check the full length, especially folds and sections you handle often. Look for cracks, surface dirt or areas where the leather feels unusually stiff or dry. Inspect the stitching and attached hardware as well. A loose fitting or frayed section needs attention, even if the rest of the lead looks sound.
Conditioning may be suitable if the leather appears dry or feels less flexible, provided there’s no structural damage and the maker’s instructions support it. Visible dirt usually calls for cleaning first, not extra conditioner. If you’re unsure about the finish, avoid experimenting with oils or waxes that could alter it.
A quotable rule: Conditioning maintains leather. It doesn’t waterproof a lead or repair damage that could make it unsafe.
Before each walk, give the lead a quick check. If a crack, split, frayed stitch or loose clip could affect your control of your dog, stop using it until it’s been properly assessed or replaced. Your furry mate’s safety comes first, and conditioner can’t make a compromised lead dependable again.
How to prepare and clean a leather dog lead before conditioning
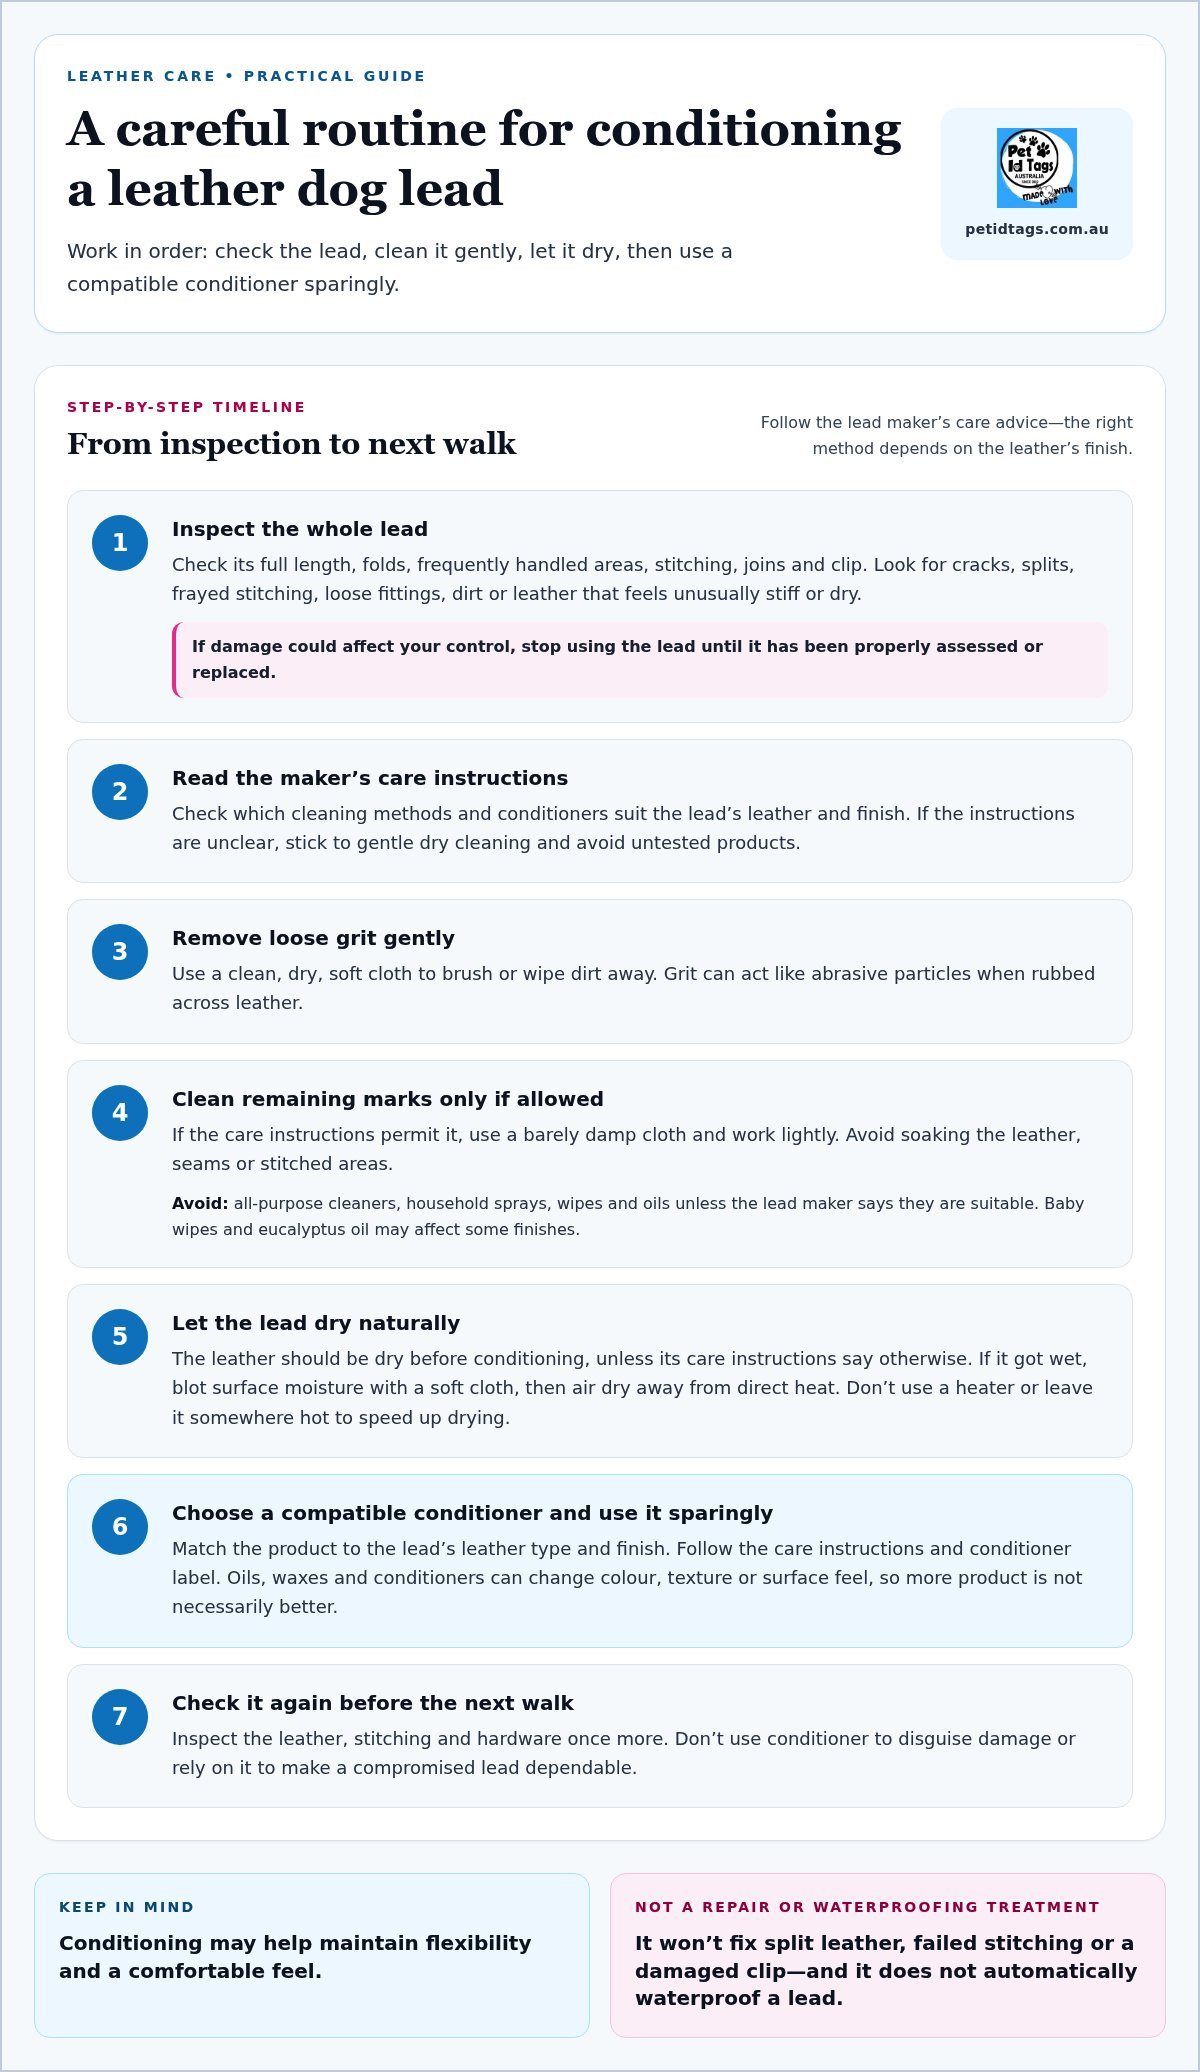
Begin with an inspection and a clean, dry surface. Dirt can act like grit when rubbed across leather, while too much water or an unsuitable cleaner may affect the finish. Follow this order: inspect the lead, read its care instructions, remove loose dirt, clean only if needed, let it dry, then condition.
Leather should be dry before conditioning, unless the lead’s care instructions say otherwise. This helps you follow the maker’s method instead of guessing. Don’t soak the lead or apply household products just because they’re convenient. If there are no care instructions, stick to gentle dry cleaning and avoid introducing an untested cleaner or conditioner.
How should you clean dirt from a leather dog lead?
Gently brush or wipe loose grit away with a clean, dry, soft cloth. For marks that remain, use a barely damp cloth only if the care instructions allow it. Work lightly and avoid saturating the leather, seams or stitched areas. The Canadian Conservation Institute outlines gentle cleaning methods for leather materials. For a dog lead, follow the maker’s directions for the specific material and finish.
Skip all-purpose sprays, wipes, oils and other household cleaners unless the lead maker says they’re suitable. A product intended for another surface may leave residue or alter the leather. If you’re unsure, don’t add a cleaner just to make the lead look spotless.
What should you check before applying conditioner?
Check the care instructions for compatible cleaners and conditioners, then inspect the full lead again. Look at the stitching, joins and areas around clips for fraying, looseness or other damage. Conditioning is not a safety repair, so don’t use it to disguise a fault that could affect control of your dog.
If the lead got wet on a walk, blot away surface moisture with a soft cloth and let it air dry naturally, away from direct heat. Don’t use a heater or leave it somewhere hot to speed up drying. Once it’s dry, check that the leather and hardware remain sound before conditioning.
A steady preparation routine makes how to condition leather dog lead australia simpler: inspect the lead, follow its care guidance, clean gently and let it dry fully before using a compatible product. For other everyday walking gear, explore personalised dog collars to keep your furry mate’s identification close at hand.
How to choose and apply leather conditioner to a dog lead
The right conditioner depends on the lead’s leather type, finish and care advice. There isn’t one product that suits every lead. Oils, waxes and conditioners can affect colour, texture and surface feel, so a product described as natural or waterproof isn’t automatically compatible with your furry mate’s lead.
Read the lead’s care instructions first, then check the conditioner label for the leather type and finish it’s intended for. Follow the maker’s directions if they recommend a particular approach. Avoid household oils and unlabelled products unless the lead maker says they’re suitable. A poor match may leave the leather darker, sticky or changed in a way you didn’t intend.
Which conditioner is suitable for your leather dog lead?
Match the product to the lead, not just to the word “leather” on the label. Finishes can respond differently to the same oil, wax or conditioner. If the instructions don’t clearly support a product, don’t assume it will work. Use only care products the maker recommends for that lead’s material and finish.
How do you apply conditioner without overdoing it?
Once you’ve confirmed the product is suitable and the lead is clean and dry, test it on a small, hidden area. Apply a little with a clean, soft cloth, following the product directions. Let the test patch dry for the time stated on the label, then check it in good light and feel the surface.
Look for unwanted darkening, stickiness or changes to the finish. If you notice any, stop rather than treating the rest of the lead. If the patch looks and feels as expected, continue with a small amount, using gentle, even strokes along the leather. Work gradually. Don’t saturate it or keep adding product because the surface still looks dry straight away.
Remove excess as directed on the conditioner label, using a clean cloth if instructed. Pay attention to folds and stitched sections, where product can collect. There’s no universal amount or application schedule. Follow the maker’s guidance and judge the lead’s condition. For anyone asking how to condition leather dog lead australia, matching the product to the finish and testing first is a safer starting point than relying on a one-product-fits-all claim.
How to dry, store and inspect a conditioned leather dog lead
After conditioning, follow the product label for drying time and whether the surface needs buffing. There’s no single waiting period that suits every conditioner or lead. Keep the lead away from direct sunlight, heaters and other direct heat while it dries. Heat can dry leather unevenly, so allow it to dry naturally in a place with airflow.
How should a leather lead dry after conditioning?
Lay the lead flat or hang it so air can circulate, following the maker’s care directions. Don’t coil it tightly or put it away while damp or with excess conditioner on the surface. If the label calls for buffing, use a clean, soft cloth and follow its instructions. The lead should feel and look ready for use, not slick or heavily coated.
A water-resistant claim doesn’t make a leather lead safe in every wet condition. Rain, puddles or a damp storage spot can still leave the lead wet, and a coating doesn’t replace drying and inspection. After a wet walk, check the care directions, let the lead dry naturally and look it over before using it again.
How can you store and check the lead between walks?
Once dry, store the lead somewhere clean and dry, away from prolonged direct sunlight and damp conditions. Before regular walks, look and feel along its full length. Check for new cracks, stiff patches or a sticky surface, then examine the stitching, joins and points where clips attach.
Check the hardware too. A clip that feels loose, won’t close securely or shows damage may affect how reliably you can control your dog. Stop using the lead if damage compromises safe handling. Conditioning can’t restore its strength. If the leather looks sound but feels different after treatment, follow the product and lead-maker instructions before taking your furry mate out.
A practical routine is to let the label guide drying and buffing, store the lead only when it’s clean and dry, and inspect it before walks. These final checks are part of how to condition leather dog lead australia safely: care for the leather, but don’t mistake a conditioned or water-resistant surface for sound stitching and secure hardware.
For other everyday walking gear, explore personalised dog collars to help keep your dog’s identification close at hand.
A simple leather dog lead care routine for Australian dog owners
Let the lead’s condition guide your care rather than following a calendar. A quick check after walks helps you spot dirt or dampness early, while the maker’s instructions guide cleaning and conditioning. The practical approach to how to condition leather dog lead australia is to act when the lead needs care, then check it’s ready before your next walk.
- After a dirty walk: Brush or wipe away loose dirt gently, following the lead’s cleaning instructions.
- After a wet walk: Let the lead dry naturally away from direct heat. Don’t condition or store it while damp.
- Before conditioning: Check the maker’s care advice and use only a compatible product. Apply it when the leather’s condition suggests it’s needed.
- Before putting it away: Make sure it’s dry, remove excess product as directed and store it somewhere clean and dry.
How often should you condition a leather dog lead?
There’s no universal schedule. Frequency depends on how often the lead is used, the conditions it encounters and the maker’s recommendations. A lead used regularly in dusty or wet conditions may need closer inspection than one used less often, but that doesn’t automatically mean it needs more conditioner.
Let the leather’s condition guide you. If it feels dry or stiff, check the care instructions and consider whether conditioning is suitable. If it already feels coated or sticky, or its colour or surface has changed after treatment, don’t add another layer. More product isn’t a substitute for checking what the lead needs.
What should you check before the next walk?
Cosmetic upkeep and safety checks are separate jobs. Conditioning may help maintain the leather’s feel, but it can’t fix cracks, frayed stitching or a loose clip. Before heading out, confirm the lead is fully dry and comfortable to hold. Inspect its full length, seams, joins and hardware. Stop using it if damage could affect safe handling.
Make sure your dog’s identification is clear and securely attached as part of your walking routine. For related gear considerations, read our personalised dog collar guide.
A little regular attention helps you make informed care decisions, but safety comes first. Choose walking gear that feels dependable in your hand and supports clear identification, so you and your furry mate can head out with greater peace of mind. Along with keeping your gear in top shape, caring for your dog with grooming essentials from oscarandzo.com.au makes cleaning up after muddy outdoor adventures just as straightforward.
Keep your dog’s lead ready for the next walk
A leather lead benefits from care suited to its finish and the maker’s instructions. Clean away dirt gently, let the lead dry fully before conditioning unless its care guidance says otherwise, and test a compatible product on a hidden spot first. Conditioning can help maintain suppleness, but it won’t repair cracks, frayed stitching or loose hardware.
For Aussie owners learning how to condition leather dog lead australia, let the lead’s condition guide the routine rather than following a fixed calendar. Check the leather, seams and clips before walks, especially after wet or muddy outings. A well-conditioned lead still needs to be safe and reliable for your furry mate.
Pet ID Tags Australia has supported pet identification since 2004 and helped over 100,000 pets get identified. Pair sound walking gear with clear identification for added peace of mind. Explore personalised pet identification tags and get your furry mate’s ID ready for your next walk.
Frequently Asked Questions
Is leather conditioner safe for every leather dog lead?
Not necessarily. Leather finishes and care requirements vary, so check the lead maker’s instructions and the conditioner label before applying anything. Test a compatible product on a small, hidden area, then let it dry before treating the full lead. Check the test patch for changes to colour, texture or feel. If you notice an unwanted change, stop and follow the maker’s care advice.
Can I use olive oil or another household oil on a leather dog lead?
Avoid household oils unless the lead maker specifically recommends them. An untested oil may change the leather’s colour or feel, leave residue or be unsuitable for its finish. Choose a product labelled for the relevant leather type, follow its directions and test a hidden area first. Don’t use oil or conditioner to disguise cracking or structural damage, as it can’t restore a lead’s strength.
How often should I condition a leather dog lead?
There’s no single interval that suits every lead. Follow the maker’s care instructions and consider the lead’s condition, how often it’s used and its exposure to dirt or wet weather. A practical approach to how to condition leather dog lead australia is to inspect regularly, clean when needed and condition only when the leather’s care guidance supports it. Too much product can leave the surface feeling coated or changed.
What happens if a leather dog lead gets wet?
Wipe away surface moisture and let the lead dry naturally, away from direct heat. Don’t store it while damp, and follow the maker’s directions before applying conditioner. Once dry, check the leather, stitching and hardware for changes or damage. If the lead has become weak, cracked or otherwise unsafe, don’t rely on conditioning to restore it. Stop using it if its condition could affect safe handling.
Can conditioning repair cracked or split leather on a dog lead?
No. Conditioning is routine care, not a reliable repair for cracked, split or torn leather. It can’t restore damaged stitching, attachment points or hardware either. Inspect the full lead and stop using it if damage could affect control or safe handling. Follow the maker’s guidance about repair or replacement rather than covering a warning sign with conditioner. A soft feel doesn’t prove the lead is structurally sound.
Should I condition a new leather dog lead before using it?
Check the care instructions before treating a new lead. It may not need conditioning straight away, and an unsuitable product could change its finish or feel. Inspect the stitching and hardware, then follow the maker’s directions for cleaning and care. If those directions don’t call for conditioner, don’t add one simply because the lead is new. Before the first walk, make sure it feels comfortable to hold and is sound.
Can I use a leather dog lead after conditioning?
Use the lead only when it’s dry, comfortable to hold and free from excess product, following the conditioner’s directions. Before a walk, check its full length, stitching and hardware. Conditioning doesn’t confirm that a worn or damaged lead is safe. If anything looks compromised, stop using it until the issue is addressed. A quick inspection helps you feel more confident before heading out with your furry mate.